Plumbing

Water Heater Installation

Water Heater Installation Denver involves a series of plumbing and electrical tasks. It requires following the manufacturer’s instructions and local code requirements.

Work safely by wearing protective gear and turning off the power supply to the area where you’re working. This will prevent accidents and injuries. You must also wear gloves when handling chemicals.

Water heaters can be a major energy-consuming appliance in the home. If you’re considering upgrading, the best option may be a tankless model that uses gas or electricity to heat the water. These use far less energy than traditional models, and they also don’t consume energy when you’re not using hot water. These models are more expensive to install than tank-style units, but they can offer significant savings over time.

Before starting any work, be sure to disconnect the power source by shutting off the breaker for the heater. It is also important to drain the existing unit and turn off the water supply valve. You can do this by attaching a garden hose to the drain valve on the bottom of the unit and placing the other end over a floor drain or outdoor pipe.

Next, remove the cover from the electrical junction box on top of the unit. Use a volt meter or circuit tester to verify that all of the wires in the unit are off and to check for a green ground wire connected to the incoming power supply. If no ground is present, follow local codes to install one.

Once the new unit is ready, carefully connect all of the electrical connections. This is a simple task for the experienced DIYer, but if you are not familiar with wiring, it may be wise to contact an electrician. During this step, you will need to cut every wire set to length and strip it if necessary. Then push the wires through the appropriate slots on the terminal block. Refer to the product manual for optimal torque, and make sure each wire is securely fastened.

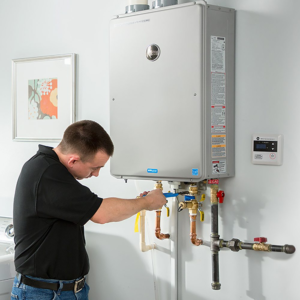
Before reconnecting the water lines, clean all copper fittings. Measure the distance between the water heater and the cold and hot water pipes to determine the length of new piping needed. Then, prepare the pipe assemblies by cutting and soldering two lengths of copper pipe. Thread the galvanized plastic-lined nipples into the cold and hot water inlet openings on the new unit, and screw them tight using a pipe wrench or channel-lock pliers.

Preparing for the Installation

A water heater installation is a big project that requires specific tools. Whether you’re installing a new gas or electric hot water heater, make sure you have the necessary equipment on hand to prevent delays in the project. Some items to consider include a pipe wrench, pliers, pipe cutter, Teflon tape, and a voltage tester. It’s also a good idea to gather any additional supplies that may be needed, such as insulation.

The next step is to prepare the area where the new water heater will be installed. Depending on the location, this may involve disconnecting the existing water supply and gas line. It’s important to be careful during this process to avoid damaging the existing water or gas lines.

Once the existing water heater is disconnected, it’s time to start the new installation. First, remove the old cover from the junction box on the top of the water heater. Then, replace the junction box cover and attach it using the screws provided.

Connect the power wires to the water heater using conduit connectors, if applicable. Ensure that the wires are properly sized to reduce fire and electrical shock risk. Also, be sure to install a new shutoff valve on the cold water line that feeds the water heater. Make sure the valve is rated for potable water.

In the case of gas water heaters, it’s a good idea to use an approved pressure relief valve in the vent line. This will help prevent carbon monoxide poisoning in the event of a leak. It’s also a good idea in general to install an emergency shutoff valve, which is typically located close to the T&P relief valve.

If you’re planning on having a natural gas water heater installed, it’s important to check with your local authority for regulations and requirements. It’s possible that you’ll need to get a permit or have your work inspected by an inspector, which can add to the overall cost of the installation. It’s also a good idea for homeowners to learn about their local building codes and to adhere to them in order to keep their home insurance coverage and avoid issues down the road.

Installing the Water Heater

Whether you’re installing an electric or gas water heater, follow the manufacturer’s instructions. Depending on local building codes, you may need to install a pressure relief valve and a discharge drain pipe. You also will need a drain pan and a new power cord for the heater.

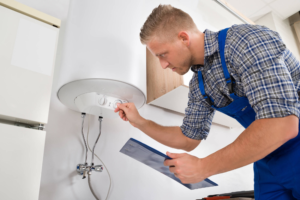
Before starting any work, shut off the water and electricity for your old water heater. Use a neon tester to check for live current and make sure the switch is off at the circuit breaker box. If there’s a lot of sediment in the tank, clean it out using steel wool. Open both hot and cold faucets in an upstairs location to drain the line to the heater. Then connect a garden hose to the water heater drain valve and run it outdoors or into a floor drain.

If you’re removing an electric water heater, take the access panel off the front of the tank to remove the wire connectors and cable clamp. If you’re removing a gas water heater, use a pipe wrench or channel-lock pliers to disconnect the gas line from the heater and the draft hood. If you’re working with plastic piping, such as PEX (cross-linked polyethylene), consult the manufacturer’s manual for specific directions.

Once you have the old water heater removed, install the piping on the new one. If possible, you can use copper piping to make the connections, but most homes have PEX now and you’ll need threaded connectors and a soldering iron that works on PEX. If you’re using copper tubing, make sure it’s rated for high temperature applications.

For a gas water heater, follow the manufacturer’s directions to make the connections to the new gas lines. If you’re venting the gas water heater through your home’s rim joist, use heat-resistant silicone sealant on the vent shaft and slip a stainless steel vent hose over it. If you’re venting the water heater through a chimney, be sure to use a stainless steel vent hose rated for that purpose. For an electric water heater, you can use a copper tubing kit to connect the electrical cables to the heater.

Installing the Gas Line

Gas water heaters are a convenient way to get hot water, but they also pose some safety concerns. Proper installation, inspection and maintenance is essential to avoid property damage or serious injury. You should always use a professional, but it is also possible to do this project yourself. If you are comfortable using power tools and working with plumbing and gas lines, you can safely install a new gas water heater in your home. Before you start, though, read all labels and the printed instructions that came with the heater. Also check with your local department of inspections to see if a permit is required and discuss any special instructions or safety precautions that apply to your area.

Turn off the gas valve at the top of the old water heater and disconnect the electrical cable from the heater by cutting it as close to the breaker box as you can. Drain the water from the tank and remove it, if necessary. If the water heater is in a gas-fired home, you may need to connect the new gas line to the gas control valve. If so, follow the manufacturer’s instructions to do so.

If the gas nipple on the new water heater is different from that of the old one, measure the distance from the gas control valve to the nipple. Buy a new nipple that is the correct length. Apply gas-rated thread sealant or tape to the nipple before you screw it onto the new water heater (Photo 7).

Make all the connections in your gas line according to the water heater’s and manufacturer’s instructions. After you make the connections, run soapy water over all locations where gas might leak to look for bubbles. When you’re done, test the gas line with a gas pressure tester.

You should also install a manual shutoff valve in the cold water line that supplies the heater. This will allow you to turn off the water to the heater in case of an emergency. It is also a good idea to install carbon monoxide detectors in your home. These are particularly important if you have a gas water heater because they give off poisonous carbon monoxide if the pilot light goes out.

Plumbing

Why Choose a Tankless Water Heater?

Tankless Water Heater Atlanta offers several advantages, including a plentiful supply of endless hot water (compared to limited flow from conventional tank models), and potential energy savings under certain conditions. They heat water on demand and operate using either an electric or gas burner.

Nonetheless, there are some factors to consider before choosing Tankless Water Heater for your home.

One of the most popular reasons people choose a tankless water heater is to cut down on their energy usage. Since they heat the water on demand, they do not have to continuously reheat the 40+ gallons of water in a storage tank and exert energy doing so. By heating the water as it flows through, they can cut down on your energy costs and reduce utility bills, and in some cases the tankless units can save you up to 50% on those costs.

The fact that a tankless water heater is much smaller than conventional models means it takes up less physical space. That also means that it can be installed closer to the point of use, so that hot water is not travelling as far and therefore requires less energy to get to your faucet. Whether it is powered by electricity or natural gas, all electric models can take advantage of a high-efficiency heat pump which further cuts down on the amount of energy they consume.

When choosing a tankless water heater, look for brands that produce Energy Star rated models. These are models that have been certified to meet certain criteria for environmental impact and utility costs, and they often offer rebates as well.

In terms of maintenance, most of these systems will need a vinegar flush at least once per year to remove minerals that build up and clog the heat exchanger. This process usually only takes about 20 minutes, and can be done by a professional plumber or home owner.

A tankless water heater can be fueled by either natural gas or electricity, but the choice depends on many factors including availability and price. Generally speaking, natural gas-powered models are more cost-effective to install and operate because they have the lowest fuel costs and are typically subsidized by local governments and power companies. Electric models are more flexible, and can be paired with solar panels to further reduce operating costs. Regardless of what type of model you choose, hiring a professional to perform the installation is highly recommended. This will ensure that all pipes, venting and gas lines are properly connected and that the system meets local code requirements.

Less Maintenance

Because Tankless Water Heaters don’t have tanks that rust and require cleaning, they typically require less maintenance. However, they do still need to be maintained to ensure that they are functioning properly and safely.

A tankless water heater’s heat exchanger has narrow passages that can become blocked by minerals such as calcium and magnesium over time. This can lead to scaling, which causes the heating element to lose efficiency and reduces the unit’s lifespan. This is why homeowners with hard water should consider scheduling regular flushing and cleaning for their units every six to nine months.

During a regular maintenance visit, the plumber will also inspect the heating element for signs of damage or erosion. They will also clean the outside of the tankless water heater and check the hoses that connect to the unit for any obstructions or leaks. In addition, the plumber will clean and lubricate each of the valves on the unit, including the water intake and outgoing water valves as well as the gas supply valve.

Most Tankless Water Heaters have a filter that needs to be cleaned regularly. This is important to keep sediment from building up inside of the unit and preventing it from working correctly. To clean the filter, the water must first be turned off and then removed from the unit. The filter can then be cleaned using a soft brush and soapy water, rinsed thoroughly, and then put back into place.

Another critical part of a regular maintenance visit is checking the venting for any blockages. The venting on a Tankless Water Heater is used to allow fresh air into the unit and to release exhaust gas. If the venting is obstructed, it can lead to carbon monoxide poisoning or an unsafe atmosphere inside of the house.

Tankless Water Heaters, both gas and electric, are powered by electricity. Therefore, it is very important that they are plugged into a circuit breaker that is on a GFCI (ground fault circuit interrupter). This will protect the unit from any electrical surges and prevent the water heater from being shut off accidentally by accident.

Smaller Footprint

Nothing cuts short a relaxing hot shower like running out of hot water. If you’re sick of lukewarm water or sudden outages in your home, consider switching from a traditional tank system to an on-demand tankless heater. While these units come with a higher initial investment, their energy efficiency and longevity will help offset the costs in the long run.

With a smaller footprint than traditional storage tank water heaters, tankless units save valuable floorspace. Additionally, since they heat only when a tap is turned on, they are more efficient than traditional tanks, which continually heat and then reheat a set amount of water in a reserve tank.

A variety of sizes and styles allow you to install tankless units in a wide range of homes, from a single unit in the bathroom to a whole-house system. Some even include Wi-Fi compatibility, allowing you to monitor and control your unit remotely with a smartphone app or touchscreen.

The specialized heating elements of these systems are also less likely to develop leaks or corrosion, making them safer and more reliable than conventional tanks. Additionally, because they only heat water when a tap is turned on, they can help prevent energy waste by eliminating wasted energy from running appliances that use hot water, such as washing machines and dishwashers.

While there are many benefits to choosing a tankless water heater, it’s important to evaluate your home and hot water needs before making the switch. For example, if you have a large household that requires multiple hot water sources simultaneously, a high GPM capacity model may be needed to accommodate your household’s demands.

In addition to lowering your utility bills, the energy-saving features of a tankless water heater can contribute to green building standards and community benefits. For instance, Seattle’s downtown commitment to green building standards aligns with the sustainable features of tankless water heaters, which require less power to operate than traditional tank water heaters.

Easy Installation

Whether you opt for a gas, propane or electric model, a tankless water heater is simple to install. In most cases, all that is needed is to locate the unit near a power outlet and the water and gas lines. A professional plumber will make all necessary connections and mount the unit to your wall. They will also check to ensure that your home’s electrical service panel can handle the energy requirements of your new unit. In the case of gas or propane units, they will hook up venting using metal or PVC pipes and ensure that the ventilation complies with local codes.

Before the installation process begins, it is important that you shut off your home’s water line and drain any standing water. This is done to prevent any water damage while removing the old tank. Likewise, you will need to empty any gas line connected to the old water heater. It is a good idea to place a bucket underneath the water line to catch any spills or drips during this step.

Next, the plumbing professional will install the water line to your new tankless water heater. For gas models, this may require a change in the gas line’s diameter. In addition, for gas units, the installer will hook up a dedicated meter and install a gas vent. They will then connect the gas and water lines to your new tankless water heater, following the instructions in its manual.

Finally, the plumber will connect an electronic control box to your unit, if applicable. This box allows you to control the temperature and flow rate of your hot water, so that it matches your household’s needs. It will also allow you to see if your water heater is operating at peak efficiency or not.

Lastly, the plumbing professional will install a pressure relief valve to protect your system from overheating and a flow valve to control your water flow. They will also install a circuit breaker that corresponds with the power requirements of your new tankless water heater. For instance, smaller electric models that operate at 240 volts require one 60-amp breaker. Larger whole-house electric models will need two breakers that have a minimum current rating of 65 amps each.